

[dutch]
Vandaag ga ik een heel veel voorkomende vraag onder fashion bloggers beantwoorden: Wat is de beste lens voor outfit foto’s? Wat je namelijk moet weten is dat een goede lens eigenlijk veel belangrijker is dan een goede body (de camera zelf). Toen ik net mijn spiegelreflex (een Nikon D90) kocht, ging ik er stiekem vanuit dat ik opeens perfecte foto’s zou maken (ik had er zoals je hieruit op kan maken niet zoveel verstand van). Viel dat even tegen! Bij het maken van outfit foto’s was er vrijwel geen verschil te zien tussen de foto’s die mijn spiegelreflex camera maakte en die mijn compact camera maakte. Ik verwachtte namelijk dat de achtergrond opeens heel onscherp zou zijn. Al gauw kwam ik er echter achter dat dit aan de lens lag. Ik kocht mijn Nikon D90 namelijk met de kitlens, de 18-55 mm F/3.5-5.6, een lens die totaal niet geschikt is voor portretfotografie. Deze lens gebruik ik nu alleen nog maar als ik video’s opneem, omdat mijn andere lenzen dan veel te ver ingezoomd zijn.
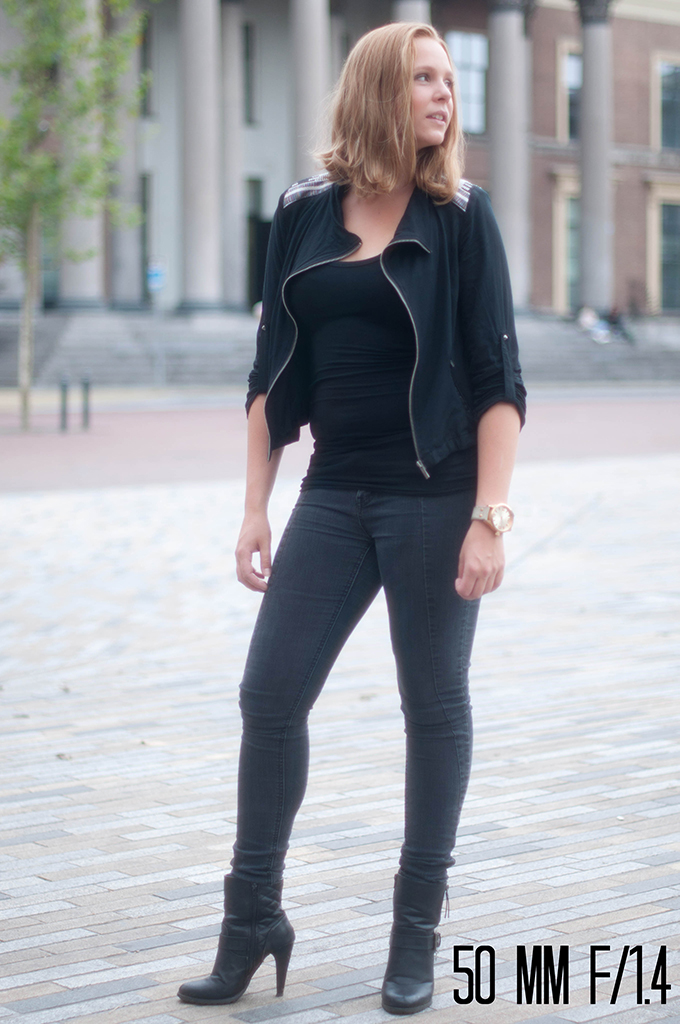
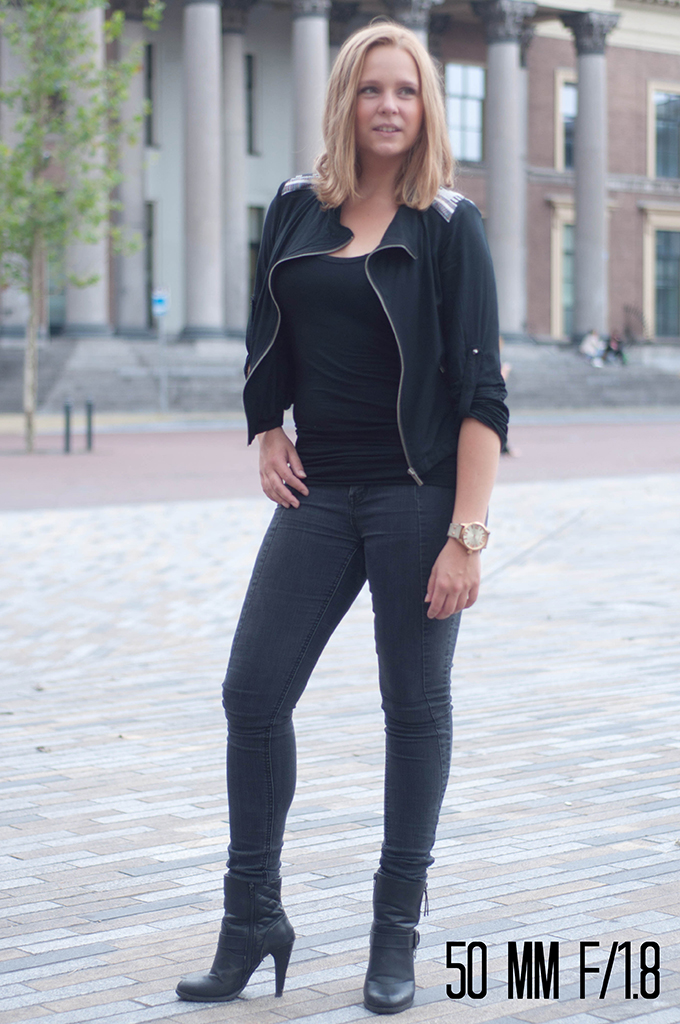
Mocht je dus nog overwegen een spiegelreflex camera aan te schaffen puur en alleen voor je outfit foto’s, koop dan een losse body en een losse lens.Welke lens je dan het beste kunt kopen hangt van je budget af. Een goede aanrader is de 50 mm F/1.8, een lens waar ik zelf tot een paar maanden geleden nog heel veel heb geschoten. Deze lens laat veel meer licht door, wat zorgt voor meer diepte en dus die gewilde wazige achtergrond. De ‘F’ staat voor diafragma: Hoe kleiner dit getal is (we spreken dan van een hóger diafragma), hoe meer scherptediepte. Zoals je op de vergelijkingsfoto’s die ik maakte van mijn lieftallige vriendin Mariëlle ziet, is het verschil tussen de 18-55 mm F/3.5-5.6 (rechts) en de 50 mm F/1.8 (links) echt enorm. De foto heeft veel meer diepte en Mariëlle lijkt niet meer tegen de achtergrond ‘geplakt’ te zijn. Ze staat los van de achtergrond en krijgt alle aandacht, terwijl op de andere foto je aandacht neigt af te dwalen naar de achtergrond. Het ziet er dus een stuk professioneler uit. En het leuke is ook dat deze lens helemaal niet duur is. Bij bol.com betaal je er bijvoorbeeld 155,99 euro voor (klik hier), wat echt niet duur is voor een lens (fotografie is een dure hobby). Deze lens heeft overigens geen ingebouwde autofocus, maar als je camera zelf ingebouwde autofocus heeft (zoals mijn Nikon D90 heeft) is dit geen probleem. Als je camera dit niet heeft hoeft dit ook geen probleem te zijn, maar dan moet je zelf scherpstellen door aan de lens te draaien: Een iets tijdrovender klusje, maar zeker niet onmogelijk.
Mocht je iets meer te besteden hebben en nóg professioneler uitziende foto’s willen, dan kan je overwegen om voor de 50 mm F/1.4 te gaan. Deze lens kost bij bol.com 349,99 euro (klik hier). Met deze lens, die ik voor mijn verjaardag kreeg van mijn lieve vriend, schiet ik tegenwoordig mijn outfit foto’s. Zoals je ziet op de foto helemaal links is de achtergrond nóg waziger en is de volle aandacht op Mariëlle gericht. Een hoger diafragma betekent echter ook dat het scherpstellen lastiger wordt. De focus is zo precies dat de camera met gebruik van de autofocus modus de neiging heeft om op bijvoorbeeld alleen een hand scherp te stellen, waardoor de rest van het lichaam een beetje onscherp wordt. Om deze reden gebruik ik dus nooit de autofocus functie, maar stel ik scherp met de hand, dus door aan de lens te draaien. Dit is soms nog wel een beetje lastig en iets wat je eigenlijk niet te gehaast moet doen. De focus op de foto die ik voor deze post maakte had eerlijk gezegd ook wel iets beter gekund, want deze ligt nu als je goed kijkt op de rechterhelft van haar lichaam (links voor de kijker). Het valt niet heel erg op, maar toch. Als je het wel goed doet heb je echter wel hele gave foto’s!
Conclusie:
– Als fashion blogger heb je weinig tot niks aan de 18-55 mm F/3.5-5.6 kitlens.
– Als je voor (relatief) weinig geld toch professioneel uitziende foto’s wil moet je zeker voor de 50 mm F/1.8 gaan.
– Als je er wat meer geld voor over hebt en supergave foto’s wil raad ik zeker de 50 mm F/1.4 aan, welke ik zelf ook gebruik.
Liefs,
Rowan
[english]
Today I’m answering a frequently asked question among fashion bloggers for you: What is the best lens for outfit photos? One thing you need to know is that a good lens is actually way more important than a good body (the camera itself). When I just got my DSLR (a Nikon D90), I actually though I would instantly take perfect photos (I didn’t really know a lot about it back then). Such a bummer! While taking outfit photos I actually didn’t see any difference between the photos my DSLR took and the ones my compact camera took. I expected the background to be very blurry all of the sudden. I quickly discovered this was because of the lens. I bought my Nikon D90 together with the kitlens, the 18-55 mm F/3.5-5.6, a lens totally unsuitable for potrait photography. I only use this lens for filming now, because my other lenses are to far zoomed in.
So if you happen to consider to buy a DSLR just for your outfit photos, buy a lose body and a lose lens. Which lens you should buy depends on your budget. A great recommendation is the 50 mm F/1.8, a lens I still used a lot until a couple of months ago. This lens lets more light pass, which causes more depth and therefore the wanted blurry background. The ‘F’ stands for aperture: The lower the number (we then speak of a hígher aperture), the more depth of field. Like you can see on the comparison photos I took of my lovely friend Mariëlle, the difference between the 18-55 mm F/3.5-5.6 (right) en de 50 mm F/1.8 (left) is huge. The photo taken with the 50 mm F/1.8 has a lot more depth and Mariëlle doesn’t look ‘attached’ to the background anymore. She gets all attention, while your attention tends to drift off to the background on the other photos. It therefore looks a lot more professional. And the best part is that this lens isn’t expensive at all. At bol.com you for example pay for 155,99 euro for it (click here), which isn’t expensive for a lens at all (photography is an expensive hobby). This lens by the way doesn’t have built-in autofocus (it is available with autofocus though, but it of course is more expensive), but this is no problem when your camera has built-in autofocus (like my Nikon D90 has). If your camera doesn’t have this, it doesn’t necessarily needs to be a problem either, but you’ll have to manually focus by turning the lens: A more time consuming duty, but not impossible.
If you’ve got a bit more to spend and want even more professional looking photos, you might want to consider getting the 50 mm F/1.4. This lens costs 349,99 euro at bol.com (click here). I now take all my outfit photos with this lens, which I got for my birthday from my sweet boyfriend. Like you can see on the photo on the left the background is even more blurry and the full attention goes to Mariëlle. A higher aperture also means that focusing gets harder. The focus is so precise that when you use the autofocus mode the camera tends to only focus on one hand, making the rest of the body look a bit unsharp. Because of this reason I never use the autofocus function, but I focus bu hand, so by turning the lens. This is a bit hard sometimes and something you shouldn’t do to hasty. To be fair the photo of the focus I took for this post could have been a bit better, because this now lies on the right part of her body (left for the viewer). It’s not a very biggie, but still. If you do it right though, you have really awesome photos!
Conclusie:
– As a fashion blogger the 18-55 mm F/3.5-5.6 kitlens is rubbish for you.
– If you want professional looking photos for (relatively) little money you should definitely opt for the 50 mm F/1.8.
-If you’ve got a little more money to spend and want awesome photos I definitely recommend the 50 mm F/1.4 which I use myself as well.
Lots of love,
Rowan


7 comments