
Image 1: Contouring like a pro in 8 steps (Kim Kardashian style)
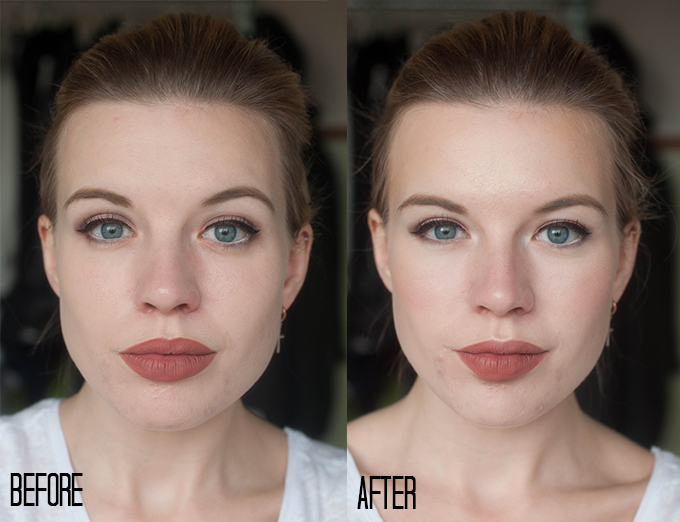
Image 2: Before and after shots (first and last photo) next to each other. See how my face looks smaller and more ‘alive’?

Image 3: The result from different angles.

Image 4: The products I used. 1. Zoeva 127 Luxe Sheer Cheek Brush (here), 2. Zoeva 231 Petit Crease Brush (here), 3. Beautyblender (here), 4. Maybelline Fit Me foundation stick soft honey (here), 5. Bobbi Brown Tinted Eye Brightener porcelain (here), 6. NYX jumbo eye pencil white (here), 7. Bourjois Bronzing Powder (here), 8. Bobbi Brown Sheer Finnish Pressed Powder White (here), 9. Art Deco Glam Vintage Blusher 5660 (here), 10. The Balm Mary-Lou Manizer (here)
[show_shopthepost_widget id=”454934″]
[dutch]
De laatste tijd krijg ik enorm veel complimenten over hoe mijn make-up zit. Mijn geheim? Contouren! Natuurlijk draagt mooie oogschaduw en mooie lippenstift daar ook aan bij, maar dat gebruikte ik al heel lang. Hetgeen wat dus echt veranderd is aan mijn daily make-up looks is het contouren, wat ik inmiddels behoorlijk goed onder de knie heb. Mijn gezicht lijkt er smaller en levendiger door, wat je goed ziet op de tweede foto. Met alleen foundation op zie ik er ook prima uit, maar het contouren geeft echt die wow-factor. Dit is dus iets wat ik dagelijks doe, maar mocht je dat te veel werk of too much vinden, dan kan je ook vanaf stap 1 direct doorgaan met stap 4, dus het contouren met concealer/foundation overslaan. Dit, dus alle acht stappen, is echter wel hoe de professionele make-up artists (ook die van Kim Kardashian!) het ook doen. Op de eerste foto zie je alle acht stappen in beeld, op de laatste foto zie je de producten die ik heb gebruikt en hieronder volgen de instructies. Lees en leer! O ja, ik heb trouwens mijn ogen en lippen voor het contouren al opgemaakt om jullie goed te laten zien wat het effect van contouren is, maar het is handiger om eerst te contouren en dan de rest.
INSTRUCTIES – CONTOUR LIKE A PRO
1. Breng je foundation aan en conceal eventuele oneffenheden. Ik gebruik de ronde kant van de beautyblender (hier) om mijn foundation, MAC Studio Fix Fluid SPF 15 Foundation (hier), aan te brengen. De puntige kant van de beautyblender gebruik ik om mijn concealer, MAC Pro Longwear concealer (hier), aan te brengen om mijn puistjes te camoufleren.
2. Gebruik een te lichte concealer om de hoge gedeelten van je gezicht te highlighten. Ik gebruik Bobbi Brown Tinted Eye Brightener (hier) in de kleur porcelain. Met de hoge gedeelten van je gezicht bedoel ik de kin, de cupidoboog (boven de bovenlip), de mondhoeken, onder de ogen en richting het oor, de twee lijnen die ontstaan wanneer je lacht (naast de neus naar de mondhoeken), de neusbrug, het voorhoofd (teken een soort boom) en net boven de kaaklijn. Gebruik een donkere concealer of foundation, ik gebruik de Maybelline Fit Me foundation stick soft honey (hier), voor het creëren van schaduwen op de lage gedeelten van je gezicht. Die lage gedeelten zijn onder het jukbeen (deze komt omhoog als je je wangen inzuigt), de zijkanten van het voorhoofd en de kaaklijn.
3. Blend alles nu in met een kwast of een beautyblender. Ik gebruik zelf een beautyblender, dit werkt naar mijn mening veel fijner dan met een kwast (de naam zegt het immers al). Tip: Blend eerst de lichte kleur en daarna de donkere kleur.
4. Nu gaan we extra contouren met poeder. We beginnen met een lichte setting poeder, welke er tevens voor zorgt dat je concealer beter blijft zitten. Ik gebruik hiervoor Bobbi Brown Sheer Finnish Pressed Powder White (hier). Kim Kardashian gebruikt trouwens Ben Nye Luxury Powder in Banana, maar dat zou bij mij nauwelijks opvallen, omdat het te donker is. De lichte poeder brengen we weer aan op de hoge gedeelten van het gezicht, precies waar je ook de lichte concealer hebt aangebracht. Op de lage gedeelten van het gezicht, dus waar je net de donkere concealer/foundation hebt aangebracht, breng je nu bronzer aan. Ik gebruik hiervoor de Bourjois Bronzing Powder (hier), welke heerlijk naar chocola ruikt. Overigens gebruik ik voor zowel het aanbrengen van de lichte poeder als de bronzer meestal mijn beautyblender, maar soms ook mijn Zoeva 127 Luxe Sheer Cheek Brush (hier). Het is maar net waar ik zin in hebt. Doe dus gewoon wat jij een fijne manier vindt. Gebruik vervolgens nog een kleine kwast, zoals de Zoeva 231 Petit Crease Brush (hier), om lichtjes bronzer aan te brengen op de zijkanten van je neus.
5. Gebruik een witte oogschaduw, poeder of crème is beide goed, om de cupidoboog, de neusbrug, de binnenste ooghoeken en het wenkbrauwbot te highlighten. Ik gebruik hiervoor de NYX jumbo eye pencil in white (hier).
6. Blend de witte oogschaduw in met je vingers of het puntje van de beautyblender. Ik gebruik voor mijn cupidoboog en neusbrug de beautyblender en voor mijn binnenste ooghoeken en wenkbrauwbot mijn vingers.
7. Breng wat meer leven in je gezicht door lichtjes blush aan te brengen op de appeltjes van je wangen en richting je oor, dus boven de bronzer. Hiervoor gebruik ik mijn Zoeva 127 Luxe Sheer Cheek Brush.
8. Breng highlighter aan boven je blush, op je voorhoofd, de brug van je neus en de cupidoboog. De highlighter die ik gebruik is The Balm Mary-Lou Manizer (hier).
Liefs,
Rowan
[english]
Lately I’ve been receiving a lot of compliments on how my make up looks. My secret? Contouring! Of course pretty eyeshadow and pretty lipstick also adds to it, but I’ve already been using that for a long time. The thing that really changed about my daily make up looks is the contouring, which I mastered quite well. It makes my face look smaller and more alive, which you can clearly see on the second image. By just using foundation I already look perfectly fine, but the contouring really gives that wow-factor. So this is something I do on a daily base, but in case that’s too much of a hassle or just ‘too much’ for you, you can also go directly to step 4 after doing the first step, so skip the contouring with concealer/foundation. This, so all eight steps, is the way the professional make up artists (also Kim Kardashian‘s) do it though. On the first image you see all eight steps pictured, in the last image you see the products I used and underneath you’ll find the instructions. Read and learn! O, and I already did my eyes and lips before contouring to really show you what’s the effect of contouring, but it’s more convenient do contour first and then the rest.
INSTRUCTIONS – CONTOUR LIKE A PRO
1. Apply your foundation and conceal any blemishes. I use the round end of the beautyblender (here) to apply my foundation, MAC Studio Fix Fluid SPF 15 Foundation (here). I use the pointy end beautyblender to apply my concealer, MAC Pro Longwear concealer (here), for hiding my pimples.
2. Use a too light concealer to highlight the high parts of your face. I use Bobbi Brown Tinted Eye Brightener (here) in the color porcelain. By the high parts of your face I mean the chin, the cupid bow (above the upper lip), the mouth ends, underneath the eyes and towards the ear, the lines that show when you smile (from the sides of your nose to your mouth ends), the bridge of your nose, your forehead (draw some sort of tree) and just above the jawline. Use a dark concealer or foundation, I use the Maybelline Fit Me foundation stick soft honey (here), for creating shadows to the low parts of your face. Those low parts are your cheekbone (this pops up when you suck in your cheeks), the sides of your forehead and your jawline.
3. Now blend everything in using a brush or a beautyblender. I use a beautyblender, this works much better than a brush in my opinion. Tip: First blend the light color and then the dark color.
4. Now we’re going to contour extra using powder. We start with a light setting powder, which also makes sure your concealer will stay put longer. I use Bobbi Brown Sheer Finnish Pressed Powder White (here) for this purpose. Kim Kardashian by the way uses Ben Nye Luxury Powder in Banana, but you would hardly see if I used it, since it’s too dark. You apply the light powder on the high parts of your face again, at the exact same places where you applied the light concealer. On the low parts of your face, where you just applied the dark concealer/foundation, you now apply bronzer. For this purpose I use the Bourjois Bronzing Powder (here), which smells like chocolate. For both the light powder and the bronzer I usually use my beautyblender for applying, but sometimes I use my Zoeva 127 Luxe Sheer Cheek Brush (here). It just depends on my mood I guess. Just do whatever you like. Next use a small brush, like the Zoeva 231 Petit Crease Brush (here), to lightly draw lines on the sides of your nose.
5. Use a white eye shadow, powder or cream are both okay, to highlight the cupid bow, the bridge of your nose, the inner corners of your eyes and the eyebrow bone. I use the NYX jumbo eye pencil in white (here) for this purpose.
6. Blend the white eye shadow using your fingers or the tip of a beautyblender. I use the tip of my beautyblender for my cupid bow and the bridge of my nose and my fingers for my the inner corners of my eyes and the eyebrow bone.
7. Bring some life into your face by gently applying blush on the apples of your cheeks towards your ear, so above the bronzer. I use my Zoeva 127 Luxe Sheer Cheek Brush for this purpose.
8. Apply highlighter above your blush, your forehead, the bridge of your nose and your cupid bow, de brug van je neus en de cupidoboog. The highlighter I use is The Balm Mary-Lou Manizer (here).
Lots of love,
Rowan


Pingback: Je gezicht contouren als een pro | Intofashion